Enough pick holders were printed. Old versions were kept and will likely be used for the costume but in less visible locations. Later models will be placed in more prominent locations. Forearm measurements showed that 10 holder could fit and still have room for the elastic band to hold.
Another model was made which didn’t have the pick guard or neck magnet like the other models. The purpose of this version was to glue larger magnets to the tray so the wrenches could be held in place. Lock picking wrenches are the pieces which actually turn the lock and apply tension while picking. Symbols were removed from the tray to match the pick guards of the later models. The symbols were placed off-center so the middle would not be weakened due to the finger holes already there.

The printed model was allowed to cool and removed from the printer. Magnets were found to hold the wrenches. These magnets were larger than the ones used on the pick holders. Each magnet was placed on the S symbol to match the curve of the S. Super Glue was used to adhere the magnets and refrigerator magnets were used on the back of the platform to hold the magnets while the glue cured.


Wrenches held in position well. Lock pick holders relied on the elastic band for some of the holding power while the wrench holders rely solely on the magnets to hold the wrenches in place. All the prints were lined up next to one another. They were arranged so holes would line up as well as possible. If all the prints had been made from the same model the holes would have lined up.


Elastic cord was run through the holes. A single cord was used so that a single ferrule, aluminum (aluminium) in this case, was all that was necessary to hold it together. Hardware store ferrules may not have been the best choice but ferrules weren’t purchased at the craft store when the elastic cord was purchased.

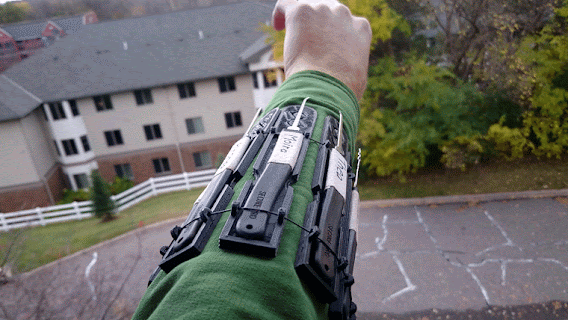
When the ferrule was crimped in place the construction was completed. Wearing the holders was as simple was hoped since the unit easily slide onto an arm over bare skin or a shirt sleeve. Photos were taken wearing the holders over a sleeve. As soon as models are published and instructions are written this project will be completed.

Downloadable Files:
The rest of the posts for this project have been arranged by date.
First time here?
Completed projects from year 1.
Completed projects from year 2.
Another model was made which didn’t have the pick guard or neck magnet like the other models. The purpose of this version was to glue larger magnets to the tray so the wrenches could be held in place. Lock picking wrenches are the pieces which actually turn the lock and apply tension while picking. Symbols were removed from the tray to match the pick guards of the later models. The symbols were placed off-center so the middle would not be weakened due to the finger holes already there.

Rotating model of wrench holder
The printed model was allowed to cool and removed from the printer. Magnets were found to hold the wrenches. These magnets were larger than the ones used on the pick holders. Each magnet was placed on the S symbol to match the curve of the S. Super Glue was used to adhere the magnets and refrigerator magnets were used on the back of the platform to hold the magnets while the glue cured.

Printed model with magnets held in place

Magnets being held by other magnets
Wrenches held in position well. Lock pick holders relied on the elastic band for some of the holding power while the wrench holders rely solely on the magnets to hold the wrenches in place. All the prints were lined up next to one another. They were arranged so holes would line up as well as possible. If all the prints had been made from the same model the holes would have lined up.

Wrenches held to holder

Pick holders lined up
Elastic cord was run through the holes. A single cord was used so that a single ferrule, aluminum (aluminium) in this case, was all that was necessary to hold it together. Hardware store ferrules may not have been the best choice but ferrules weren’t purchased at the craft store when the elastic cord was purchased.

Metal ferrule for joining the elastic bands
When the ferrule was crimped in place the construction was completed. Wearing the holders was as simple was hoped since the unit easily slide onto an arm over bare skin or a shirt sleeve. Photos were taken wearing the holders over a sleeve. As soon as models are published and instructions are written this project will be completed.

Pick holders standing up
View of holders being worn
Downloadable Files:
- Holder
Revise holder according to measurementsPrint and build revised model. Revise again if necessaryAssemble full set with elastic cord- Assemble and compress all files
- Write instructions
The rest of the posts for this project have been arranged by date.
First time here?
Completed projects from year 1.
Completed projects from year 2.
Disclaimer for http://24hourengineer.blogspot.com/
This disclaimer must be intact and whole. This disclaimer must be included if a project is distributed.
All
information in this blog, or linked by this blog, are not to be taken
as advice or solicitation. Anyone attempting to replicate, in whole or
in part, is responsible for the outcome and procedure. Any loss of
functionality, money, property or similar, is the responsibility of
those involved in the replication.
All digital communication regarding the email address 24hourengineer@gmail.com becomes
the intellectual property of Brian McEvoy. Any information contained
within these messages may be distributed or retained at the discretion
of Brian McEvoy. Any email sent to this address, or any email account
owned by Brian McEvoy, cannot be used to claim property or assets.
Comments
to the blog may be utilized or erased at the discretion of the owner.
No one posting may claim claim property or assets based on their post.
This blog, including pictures and text, is copyright to Brian McEvoy.
2015-10-23 (F)
Comments
Post a Comment