
I
found a huge shortcut to take with this project which cuts out all the work of
programming and most of the assembly and building work. I struggled with the
idea of just plowing ahead with the hard way but couldn’t bring myself to take
the hard path when the easy path is the logical one.
This
project had two purposes. The first purpose was to learn about temperature
control by forcing myself to think about implementing it and I’ve already done
that. The second purpose was to get an awesome little sous vide oven.
Enough
background.
----------
Off-the-shelf
temperature controllers had not been considered for this project because they
were assumed to all be of industrial quality and prohibitively expensive. Contrary
to that assumption a light-duty temperature controller with display, buttons,
and relay comes to less than fifteen dollars after shipping charges. This cost
factor makes it illogical to continue programming an Arduino which would have
to be assembled and additional parts would have to be ordered such as control
buttons. A temperature controller was ordered from an eBay.com
domestic seller.

Inexpensive temperature controller
To
find a suitable enclosure for the controller the dimensions were taken from the
product page and a 1:1 drawing was made. For visualization’s sake a raster
image of the faceplate was scaled and trimmed to fit the dimensions. The
vector/raster drawing was printed to scale and a PDF was made. A second
revision was made which has dashed “FOLD” lines and scissor icons on the lines
which are meant to be cut. The scissor icon took longer to draft than the
outline of the controller.
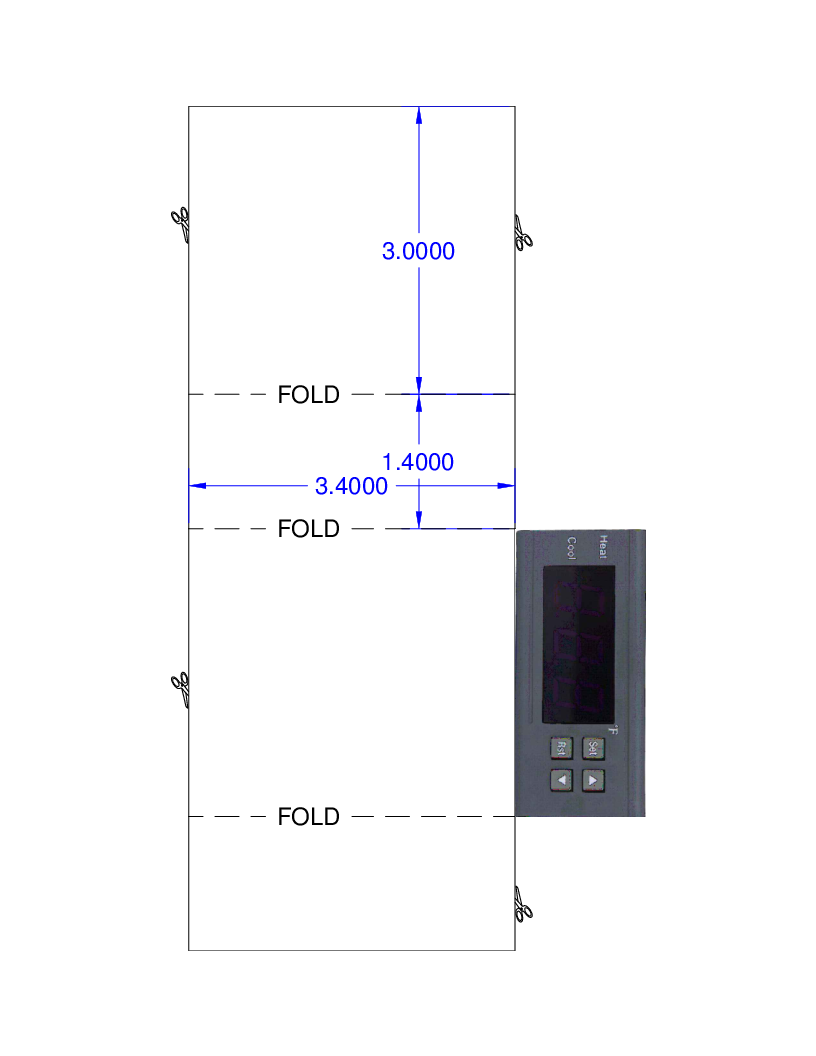

Paper model of temperature controller
The
project at this point is no longer about eh programming or gathering of
intricate parts but instead the pleasing assembly of the parts into a finished
looking appliance. When selecting an enclosure it may be prudent to select one
with sufficient space to add a solid state relay and circumvent the mechanical
relay in the controller.
A trip was made to two thrift stores to find parts such as something to use as an enclosure, something to hold the thermometer probe, a vacuum sealer, and a thermometer. Only a thermometer was found.

Inexpensive thermometer
To do:
- Buy:
- Enclosure
- Whisk
- Vacuum sealer
- Handy box
- Receptacle
- Receptacle cover
- Find:
- 3.5mm plug
- 3.5mm jack
- Construct
- Test
The rest of the posts for this project have been arranged by date.
A list showing of all the final posts of COMPLETED projects.
Disclaimer for http://24hourengineer.blogspot.com/
This disclaimer must be intact and whole. This disclaimer must be included if a project is distributed.
All
information in this blog, or linked by this blog, are not to be taken
as advice or solicitation. Anyone attempting to replicate, in whole or
in part, is responsible for the outcome and procedure. Any loss of
functionality, money, property or similar, is the responsibility of
those involved in the replication.
All digital communication regarding the email address 24hourengineer@gmail.com becomes
the intellectual property of Brian McEvoy. Any information contained
within these messages may be distributed or retained at the discretion
of Brian McEvoy. Any email sent to this address, or any email account
owned by Brian McEvoy, cannot be used to claim property or assets.
Comments
to the blog may be utilized or erased at the discretion of the owner.
No one posting may claim claim property or assets based on their post.
This blog, including pictures and text, is copyright to Brian McEvoy.
I use one of these for Mead making. I brew between 70 and 150 gallons at a time in a stainless steel tank in my parent's winery. The trouble is my preferred yeast doesn't do well below 70f, and the winery is usually between 55f and 60f. With a silicone heating pad plugged into this thing, I was able to keep my brew between 75f and 80f to keep the yeasty beasties working.
ReplyDeleteThe one we got was $25, which I could almost have built an Arduino+Temp+120v relay unit for, but not if I included Display and Case. I hadn't considered its possible use for Sous Vide, though. That might make for some interesting meals in the near future.
Thanks! I really have enjoyed your work! found you from Instructables.
That's a great example! Thank you.
DeleteI haven't heard of using a silicone heating pad before? Is the purpose to keep from applying heat that is too severe to your mixture?