The tone of 2xCb+Mic was more silly than usual especially considering our subject was failed grinds. Nothing so simple as rejected magnet implants or botched self-surgeries, no, we talked about projects people tried to get off the ground but ultimately they didn't make it. Our number one subject was me! I know my failures better than anyone.

The Tough Pi-ano saw good progress over the last couple weeks. An adapter board was built with neat resistors. This was the answer to the first adapter board which didn't have any resistors and some had to be added after the board was already constructed. The picture below shows the neat resistor alignment.

After a board was made with a repeatable pattern for the resistors two more boards were made and wired. All three boards were given long wires so they would be guaranteed to reach the arcade buttons at which point they would be trimmed.

Switches which were ordered at the beginning of this project finally arrived after international shipping. Stocked switches were swapped out on the first octave which was already in place.

Every plastic button was installed, every switch was attached to a button, all the wires were trimmed, crimped, and connected to the adapter boards. 48 switches with two crimped wires each. The common wires were tied together for each octave to make the wiring simpler.

Components were arranged for each of the four computers. Each computer had a Pi 0, memory card, OTG cable, sound card, audio wire, and power cord. At the center of all these was a USB hub and a six-way headphone coupler.

When the switches were wired it became apparent the Pi-ano couldn't rest on it's top forever so a shelf was built to support everything. The shelf was only a 1x10 piece of lumber which was trimmed to avoid end pieces and knots on the edges.

More wood was cut for the rear half the Pi-ano. This would cover some of the electronics and give room for all the wiring. The wood was the same dimensions as the keyboard. It was given side supports the same as the keyboard.

All the visible wood was coated with a stain/polyurethane mixture. It was glossy black. Since it was painted on ordinary wood it would not have the smooth sheen of a commercially available piano. Wood grain would always be visible. From a normal playing view none of the screws or bolts would be visible.

When the stain/polyurethane dried everything was assembled. I was very pleased with how it looked. Look at it, man!

The rear part of the Pi-ano was bolted to the keyboard and secured with mending braces as well as a 1x2 running between the two for support against the shelf. All the wiring between the computers, like sound and power, was installed and secured with tie blocks and zip ties.

Video was recorded and narrated. The narration was recorded separately and the video was shot while listening to the recording. It was the best way I knew to keep the tracks in sync. When I narrated the Color/Touch the script was basic and dull. This time I challenged myself to write a script that I could read without anything sounding funny but I wanted to put a pun in each sentence. I did with the exception of one sentence. I was happy with how this project turned out. There will probably be an update when it gets installed.
A new project was publicized. This project got some attention during an interview with the Dangerous Minds Podcast. For a long time I have wanted to have a computer I could use while talking and didn't take all my attention away from where I was going. Google Glass would have been perfect except for the price. So, like many people, I've decided to build my own. For a CPU I've chosen a power-conservative, pocket-sized Raspberry Pi Zero. For the display I found a video display that can mount to glasses. Fortunately, the Pi 0 has an analog video output hidden as a couple terminal points.

All the necessary parts were assembled and a working model was made pretty quickly.

Keeping the display aligned properly proved problematic. The included attachment method of rubber bands didn't work well and were prone to wandering. Unlike some other projects with head-mounted displays this one didn't look absolutely preposterous. It has no camera, nor does it need one.

The first attempt at a mounting method failed since the mounting hardware was larger than the glasses it was supposed to mount into. 3D printed parts seemed the most logical since they can be reproduced easily and tweaked quickly from one iteration to the next.
For people wishing to copy this project, they would have enough information to do everything. Now it's just a matter of me working to make it usable for myself.

Brian - Left. Tim - Right.
The Tough Pi-ano saw good progress over the last couple weeks. An adapter board was built with neat resistors. This was the answer to the first adapter board which didn't have any resistors and some had to be added after the board was already constructed. The picture below shows the neat resistor alignment.

Neat resistors on adapter board
After a board was made with a repeatable pattern for the resistors two more boards were made and wired. All three boards were given long wires so they would be guaranteed to reach the arcade buttons at which point they would be trimmed.

Two more boards built with neat resistors
Switches which were ordered at the beginning of this project finally arrived after international shipping. Stocked switches were swapped out on the first octave which was already in place.

Connecting the new switches
Every plastic button was installed, every switch was attached to a button, all the wires were trimmed, crimped, and connected to the adapter boards. 48 switches with two crimped wires each. The common wires were tied together for each octave to make the wiring simpler.

Every switch wired up to the adapter boards
Components were arranged for each of the four computers. Each computer had a Pi 0, memory card, OTG cable, sound card, audio wire, and power cord. At the center of all these was a USB hub and a six-way headphone coupler.

All the computer parts for each octave
When the switches were wired it became apparent the Pi-ano couldn't rest on it's top forever so a shelf was built to support everything. The shelf was only a 1x10 piece of lumber which was trimmed to avoid end pieces and knots on the edges.

Shelf cut for the bottom
More wood was cut for the rear half the Pi-ano. This would cover some of the electronics and give room for all the wiring. The wood was the same dimensions as the keyboard. It was given side supports the same as the keyboard.

Making the back portion of the Pi-ano
All the visible wood was coated with a stain/polyurethane mixture. It was glossy black. Since it was painted on ordinary wood it would not have the smooth sheen of a commercially available piano. Wood grain would always be visible. From a normal playing view none of the screws or bolts would be visible.

Staining the wood
When the stain/polyurethane dried everything was assembled. I was very pleased with how it looked. Look at it, man!

Final look of the Pi-ano
The rear part of the Pi-ano was bolted to the keyboard and secured with mending braces as well as a 1x2 running between the two for support against the shelf. All the wiring between the computers, like sound and power, was installed and secured with tie blocks and zip ties.

Wiring for power and sound
Video was recorded and narrated. The narration was recorded separately and the video was shot while listening to the recording. It was the best way I knew to keep the tracks in sync. When I narrated the Color/Touch the script was basic and dull. This time I challenged myself to write a script that I could read without anything sounding funny but I wanted to put a pun in each sentence. I did with the exception of one sentence. I was happy with how this project turned out. There will probably be an update when it gets installed.
Final video demonstration of the Tough Pi-ano
A new project was publicized. This project got some attention during an interview with the Dangerous Minds Podcast. For a long time I have wanted to have a computer I could use while talking and didn't take all my attention away from where I was going. Google Glass would have been perfect except for the price. So, like many people, I've decided to build my own. For a CPU I've chosen a power-conservative, pocket-sized Raspberry Pi Zero. For the display I found a video display that can mount to glasses. Fortunately, the Pi 0 has an analog video output hidden as a couple terminal points.

Neatly wired portable computer
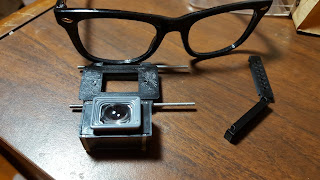
All the necessary parts were assembled and a working model was made pretty quickly.

Parts for a head-mounted display and computer
Keeping the display aligned properly proved problematic. The included attachment method of rubber bands didn't work well and were prone to wandering. Unlike some other projects with head-mounted displays this one didn't look absolutely preposterous. It has no camera, nor does it need one.

Wearing a head-mounted display and carrying a computer on my shoulder
The first attempt at a mounting method failed since the mounting hardware was larger than the glasses it was supposed to mount into. 3D printed parts seemed the most logical since they can be reproduced easily and tweaked quickly from one iteration to the next.
For people wishing to copy this project, they would have enough information to do everything. Now it's just a matter of me working to make it usable for myself.

First attempt at a viewer positioner
The rest of the weekly summaries have been arranged by date.
Disclaimer for http://24hourengineer.blogspot.com/
This disclaimer must be intact and whole. This disclaimer must be included if a project is distributed.
All information in this blog, or linked by this blog, are not to be taken as advice or solicitation. Anyone attempting to replicate, in whole or in part, is responsible for the outcome and procedure. Any loss of functionality, money, property or similar, is the responsibility of those involved in the replication.
All digital communication regarding the email address 24hourengineer@gmail.com becomes the intellectual property of Brian McEvoy. Any information contained within these messages may be distributed or retained at the discretion of Brian McEvoy. Any email sent to this address, or any email account owned by Brian McEvoy, cannot be used to claim property or assets.
Comments to the blog may be utilized or erased at the discretion of the owner. No one posting may claim property or assets based on their post.
This blog, including pictures and text, is copyright to Brian McEvoy.
Comments
Post a Comment