Where I work, I have to prop steel doors open all the time. These doors are part of industrial enclosures. If you have ever been in a factory, they are the gray metal boxes usually hanging on a wall. The enclosures range in size from a desktop computer case to a closet. The smallest ones sit on a tabletop while I test them and it is often possible to wedge something between the door and the table to keep the door from swinging shut and interfering. The free-standing ones are more difficult than the small ones, so I wanted to make something that would work for any steel enclosure and be easy to move around. Naturally, I was attracted to the idea of using magnets.
The design was nothing more elaborate than a couple of magnets with a string between them. During the build, important issues came up, so this became more complex than tying two cheap magnets together.
Enough background
----------
Hook magnets were ordered online. They were less than ideal because they had open hooks rather than eye-bolts or carabiners. They also used ceramic magnets instead of rare earth, neodymium. A couple of steel cans with flat surfaces larger than the magnets were covered in plastic food wrap. The liquid electrical tape was opened an mixed with a disposable chopstick. It had been sitting for several months.
The bottoms of the magnets were uncoated so it would have been possible for them to scratch the surfaces I was interested in protecting. Rubber coated magnets were available for purchase, but they were significantly more expensive.
Parachute cord was tied between the hooks of the magnets. Rubber bands were added at the hooks to keep the knots from falling off the hooks.

The liquid electrical tape was painted on the bottoms of the magnets. This was a bit messy since the consistency of the tape was lumpy. The smell was also strong and should be done in a well-ventilated area, as per the instructions.

Once the liquid was applied, the magnets were set on the covered cans, and the plastic was pulled tight, so there were no wrinkles between the food can and the magnet. Some of the liquid spilled out and was left alone.

The liquid tape was allowed to dry in the garage where the smell would not be noticed. The chopstick used for mixing was dried with the rest so it could be safely disposed of once dry. It was unknown if the liquid tape would bond with the plastic food wrap or simply peel away later.

When the tape was dry, the plastic was pulled away, but it had bonded. Instead of fighting it, the plastic was cut away, and a small circle of it was left in place. Ordinary scissors were used to cut it, and during the process, they stuck to the magnet repeatedly.

The magnets were tested on some doors which were larger than average, and they failed to keep the door open. Friction between the door and the magnet was low due to the plastic food wrap, and the magnets were too weak for the job in the first place. On top of that, the liquid tape peeled off easily.

There were stronger magnets at the local surplus store, and they came with loops instead of hooks. Aside from not being rubber coated, these were ideal. They were roughly three times the cost.

The new magnets were coated on the job with masking tape. Masking tape was chosen because it should last several years, it was available, the width of the tape was enough to cover the magnets, and it had some cushioning because of its makeup. Two layers were used.

A coating with higher friction may be a valuable step in the future, but the magnets work admirably on a large door. Vinyl coating or PVC tape may be a good alternative.

First time here?
Completed projects from year 1
Completed projects from year 2
Completed projects from year 3
Completed projects from year 4
Completed projects from year 5
Disclaimer for http://24hourengineer.blogspot.com and 24HourEngineer.com
This disclaimer must be intact and whole. This disclaimer must be included if a project is distributed.
All information on this blog, or linked by this blog, is not to be taken as advice or solicitation. Anyone attempting to replicate, in whole or in part, is responsible for the outcome and procedure. Any loss of functionality, money, property or similar, is the responsibility of those involved in the replication.
All digital communication regarding the email address 24hourengineer@gmail.com becomes the intellectual property of Brian McEvoy. Any information contained within these messages may be distributed or retained at the discretion of Brian McEvoy. Any email sent to this address, or any email account owned by Brian McEvoy, cannot be used to claim property or assets.
Comments to the blog may be utilized or erased at the discretion of the owner. No one posting may claim property or assets based on their post.
This blog, including pictures and text, is copyright to Brian McEvoy.
2018-11-05
The design was nothing more elaborate than a couple of magnets with a string between them. During the build, important issues came up, so this became more complex than tying two cheap magnets together.
Enough background
----------
Hook magnets were ordered online. They were less than ideal because they had open hooks rather than eye-bolts or carabiners. They also used ceramic magnets instead of rare earth, neodymium. A couple of steel cans with flat surfaces larger than the magnets were covered in plastic food wrap. The liquid electrical tape was opened an mixed with a disposable chopstick. It had been sitting for several months.
The bottoms of the magnets were uncoated so it would have been possible for them to scratch the surfaces I was interested in protecting. Rubber coated magnets were available for purchase, but they were significantly more expensive.
Parachute cord was tied between the hooks of the magnets. Rubber bands were added at the hooks to keep the knots from falling off the hooks.
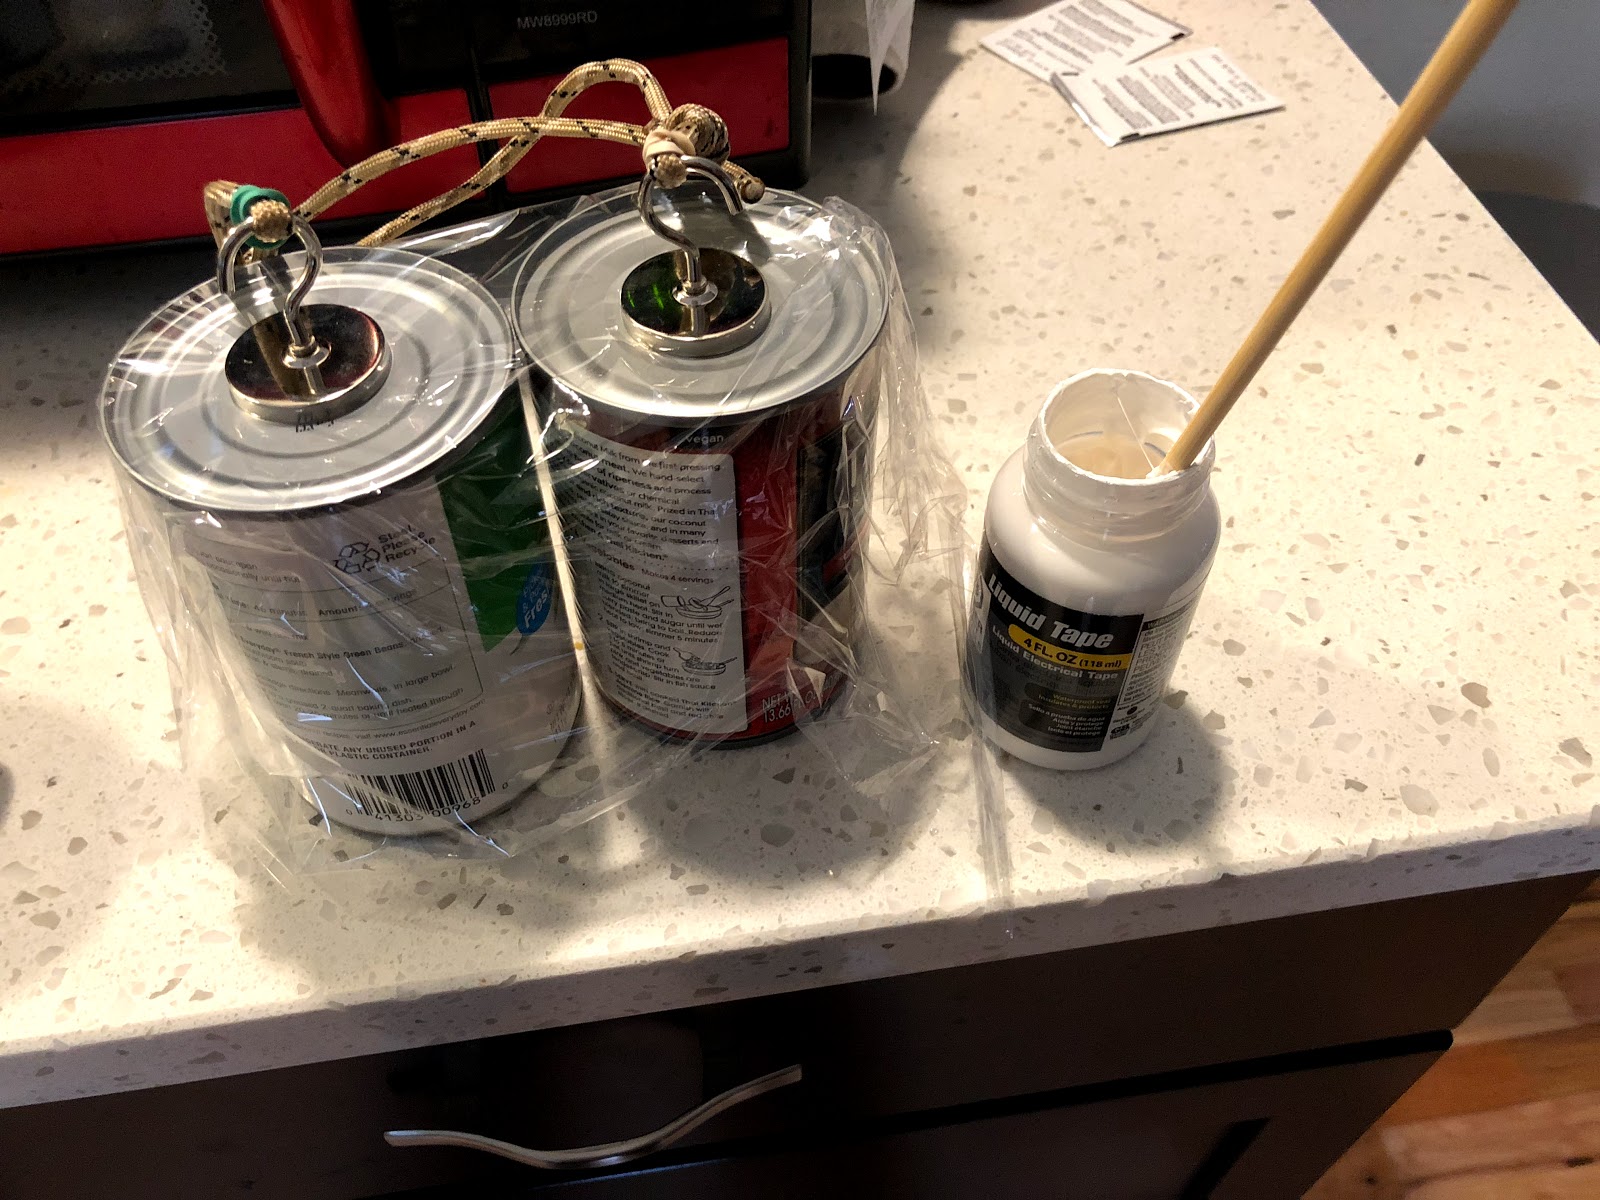
Gathered materials
The liquid electrical tape was painted on the bottoms of the magnets. This was a bit messy since the consistency of the tape was lumpy. The smell was also strong and should be done in a well-ventilated area, as per the instructions.

Applying liquid tape to magnet bases
Once the liquid was applied, the magnets were set on the covered cans, and the plastic was pulled tight, so there were no wrinkles between the food can and the magnet. Some of the liquid spilled out and was left alone.

Making a nice flat bottom to the coated magnet
The liquid tape was allowed to dry in the garage where the smell would not be noticed. The chopstick used for mixing was dried with the rest so it could be safely disposed of once dry. It was unknown if the liquid tape would bond with the plastic food wrap or simply peel away later.

Allowing the liquid tape to dry
When the tape was dry, the plastic was pulled away, but it had bonded. Instead of fighting it, the plastic was cut away, and a small circle of it was left in place. Ordinary scissors were used to cut it, and during the process, they stuck to the magnet repeatedly.

Dried tape bonded with food wrap
The magnets were tested on some doors which were larger than average, and they failed to keep the door open. Friction between the door and the magnet was low due to the plastic food wrap, and the magnets were too weak for the job in the first place. On top of that, the liquid tape peeled off easily.

Failed attempt #1
There were stronger magnets at the local surplus store, and they came with loops instead of hooks. Aside from not being rubber coated, these were ideal. They were roughly three times the cost.

New magnets
The new magnets were coated on the job with masking tape. Masking tape was chosen because it should last several years, it was available, the width of the tape was enough to cover the magnets, and it had some cushioning because of its makeup. Two layers were used.

Masking tape coating
A coating with higher friction may be a valuable step in the future, but the magnets work admirably on a large door. Vinyl coating or PVC tape may be a good alternative.

Magnets holding a door open
First time here?
Completed projects from year 1
Completed projects from year 2
Completed projects from year 3
Completed projects from year 4
Completed projects from year 5
Disclaimer for http://24hourengineer.blogspot.com and 24HourEngineer.com
This disclaimer must be intact and whole. This disclaimer must be included if a project is distributed.
All information on this blog, or linked by this blog, is not to be taken as advice or solicitation. Anyone attempting to replicate, in whole or in part, is responsible for the outcome and procedure. Any loss of functionality, money, property or similar, is the responsibility of those involved in the replication.
All digital communication regarding the email address 24hourengineer@gmail.com becomes the intellectual property of Brian McEvoy. Any information contained within these messages may be distributed or retained at the discretion of Brian McEvoy. Any email sent to this address, or any email account owned by Brian McEvoy, cannot be used to claim property or assets.
Comments to the blog may be utilized or erased at the discretion of the owner. No one posting may claim property or assets based on their post.
This blog, including pictures and text, is copyright to Brian McEvoy.
2018-11-05
Comments
Post a Comment